Why use a rain barrel?
Did you know that just a half-inch of rain falling on a 1,000 square foot house will generate about 300 gallons of water? Over the course of spring and summer (assuming 10 inches of rainfall), a roughly 1,300 square feet house can generate about 8,000 gallons of water! Saving that in a rain barrel to use in your garden means you’re not using municipal water (so dollar savings for you and better, untreated water for your plants)
6 Easy Steps for Setting Up a Rain Barrel System
Step 1:
Install gutters on your house, along with a downspout. If you already have a home with these features this will be the easiest step!
Step 2:
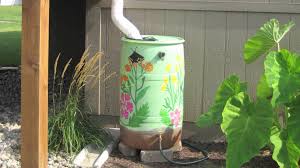
Find something to collect the rain water in. Most people opt to use a 50-gallon drum, but just about anything that holds a decent amount of water will work. If you decide to use a smaller container, you might want to consider having a set up involving more than one. This can make the entire set up more complex so it would be best to have one large collection tank. Once you decide on your tank, you will need to cut a small hole to fit a spigot in the bottom of it. Make sure it is low enough on the tank for gravity to allow all the water to drain out.
You can also find premade rainbarrels at most home supply stores or through online retailers. Look for sturdy construction and attached overflow valves and spigots.
Step 3:
Install tubing or a short section of gutter to divert the water from the downspout into your rain barrel. This can be done in a variety of ways but is essentially just a tube connecting the two. When the barrel is full the water will just go out the downspout as it did before having a rain barrel. You can also buy an overflow pipe that connects into this system. This is an important component because it will direct the water away from your foundation once the rain barrel fills up.
Step 4:
Build (or buy) a stand to elevate the rain barrel — at least 1 foot high but customize to your height and landscape. The purpose of elevation is to use gravity to get the water flowing. If your garden is downhill from your rain barrel, you will need less height.
Step 5:
Install a filter between the downspout and rain barrel. Just a simple piece of screen will work but there are many premade options available online. This is an important step to keep debris out of your barrel which will eventually clog the spigot. It also would not hurt to have another back up filter where the spigot sits in the bottom of the barrel to ensure the hose connected to the spigot doesn’t get any unwanted debris in it that the other filter let pass through.
Step 6:
Connect a hose to the spigot and your rain barrel is ready for use! Once water accumulates in it, you can start watering your garden!
How to use Rainwater in your Garden
The water you collect with your rain barrel will most likely be very clean, provided you have a clean gutter system. This water is not considered potable because it’s run off your roof which has dirty, animal droppings, and so on. The water, though, is perfectly fine for all garden plants, bushes, trees, lawn, and even indoor plants.
Rain barrels do not typically have enough pressure to run a hose or sprinkler system. However, if you have enough slope you could use a soaker hose in between garden rows. It is also possible to install an electric pump (such as used in fountains) to create enough pressure to use with a hose.
Potential Problems with Rain Barrels
One of the biggest problems that come up with a rain barrel system is the connections getting clogged. This can be alleviated by using screen filters at the water intake site and by occasionally cleaning out the barrel.
Another thing to watch out for is insects that will try to reproduce in the water especially nasty mosquitoes. If you drain the rain barrel regularly the larvae will not have time to hatch. Also putting a lid on the rain barrel and draining it and disconnecting it before vacations will keep bugs away.